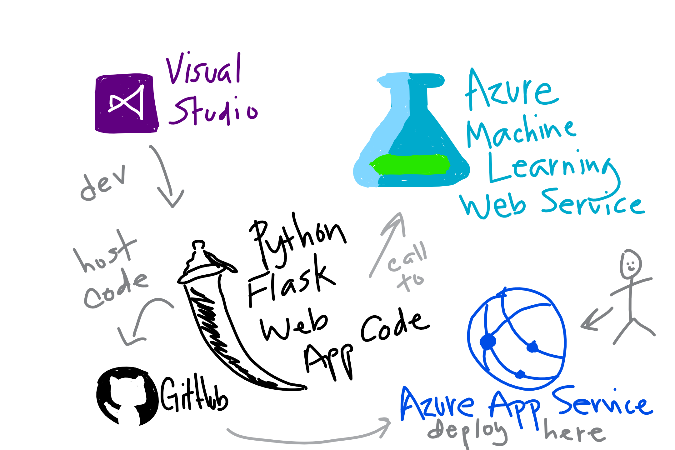
tl;dr: Azure Machine Learning + Visual Studio + Python Flask + GitHub + Azure = A Live Custom ML Model for You!
Posted: 2017-02-05
Introduction
Ok, so I have an interesting REST endpoint (in my case, a machine learning model for using a company's Wikipedia article to find similar companies), what can I do next? Why not serve it up in a simple web app to impress friends and wow colleagues? (Really, you can use this intel to create a web app around any REST endpoint, as half of my purpose in writing this is to show how fast and easy Python Flask is).
Essentially, we are making a web app wrapper around a data submission and retrieval REST endpoint that is created through Azure Machine Learning (AML) Studio (https://studio.azureml.net), a friendly and powerful machine learning tool with a handy browser UI. In this post, the endpoint is a service that clusters companies based on descriptive text (our input data). The clustering model, a k-means algorithm, has been trained on close to 500 wikipedia entries, a cool example of unsupervised learning. If you don't know much yet about AML Studio and would like to know more this is a good place to start or dive in and learn by doing with a quick getting-started tutorial here. You'll need to know, at least, how to publish an experiment from Studio to get your Flask web app going.
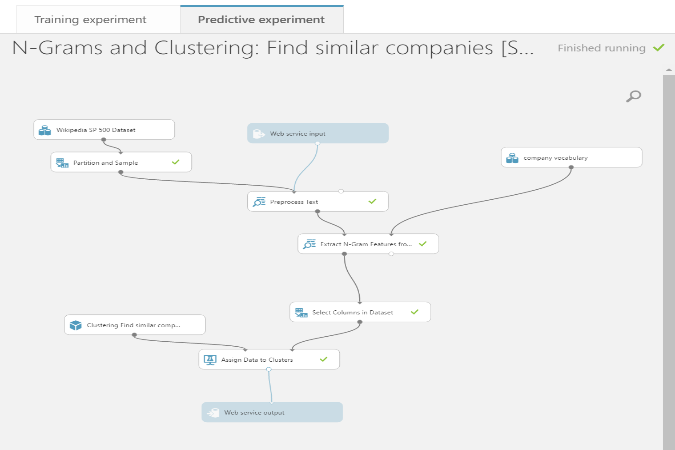
The ML web service is based around an AML scoring experiment, built from a training experiment in which K-Means Clustering module is used to assign companies to groups based on features in their processed Wikipedia text. The Extract N-Gram Features from Text module (more info here) is used after some initial cleansing of the text data (remove stop words, numbers, special characters, detect sentences, etc. - see the Preprocess Text AML module here) to extract features upon which to train the k-means clustering model and reduce the dimensionality to the most important chunks of information. The scoring experiment uses a stored vocabulary from the training data n-gram feature extraction process (a good explanation of n-grams can be found in this blog on extracting features from text for classification, a different kind of ML algorithm - check it out here).
Real quick, an example of extracting n-grams from: "Time lost is never found."
- An example from the blog link I just listed above (this one)
| Where n=1, that is a uni-gram | Where n=2, that is a bi-gram | Where n=3, that is a tri-gram |
|---|---|---|
| Time | Time lost | Time lost is |
| lost | lost is | lost is never |
| is | is never | is never found |
| never | never found | |
| found |
So, you have an idea of the initial training dataset (but imagine 10,000 or more of these n-grams as our features from all of that Wikipedia text - it can be seen why feature selection is sometimes helpful for narrowing down to the most important features and we can also do this with the Extract N-Gram Features from Text module in AML). Ok, let's move on to the app building fun.
Our web app is going to utilize a microframework for building web apps purely in the Python programming language. A big reason to begin in this framework is that Python, a popular Data Science language, is easy to read and learn and Visual Studio has a Flask web app template as part of the Python Tools for Visual Studio extension, making life much easier for us. Python, as a language, is also known for being a popular web app development language and has other projects like Django and Bottle for these ends (also with templates in VS).
That all being said, most of this post is about creating the Flask web app. I'll leave it to other guides and articles to discuss working with AML and k-means in detail.
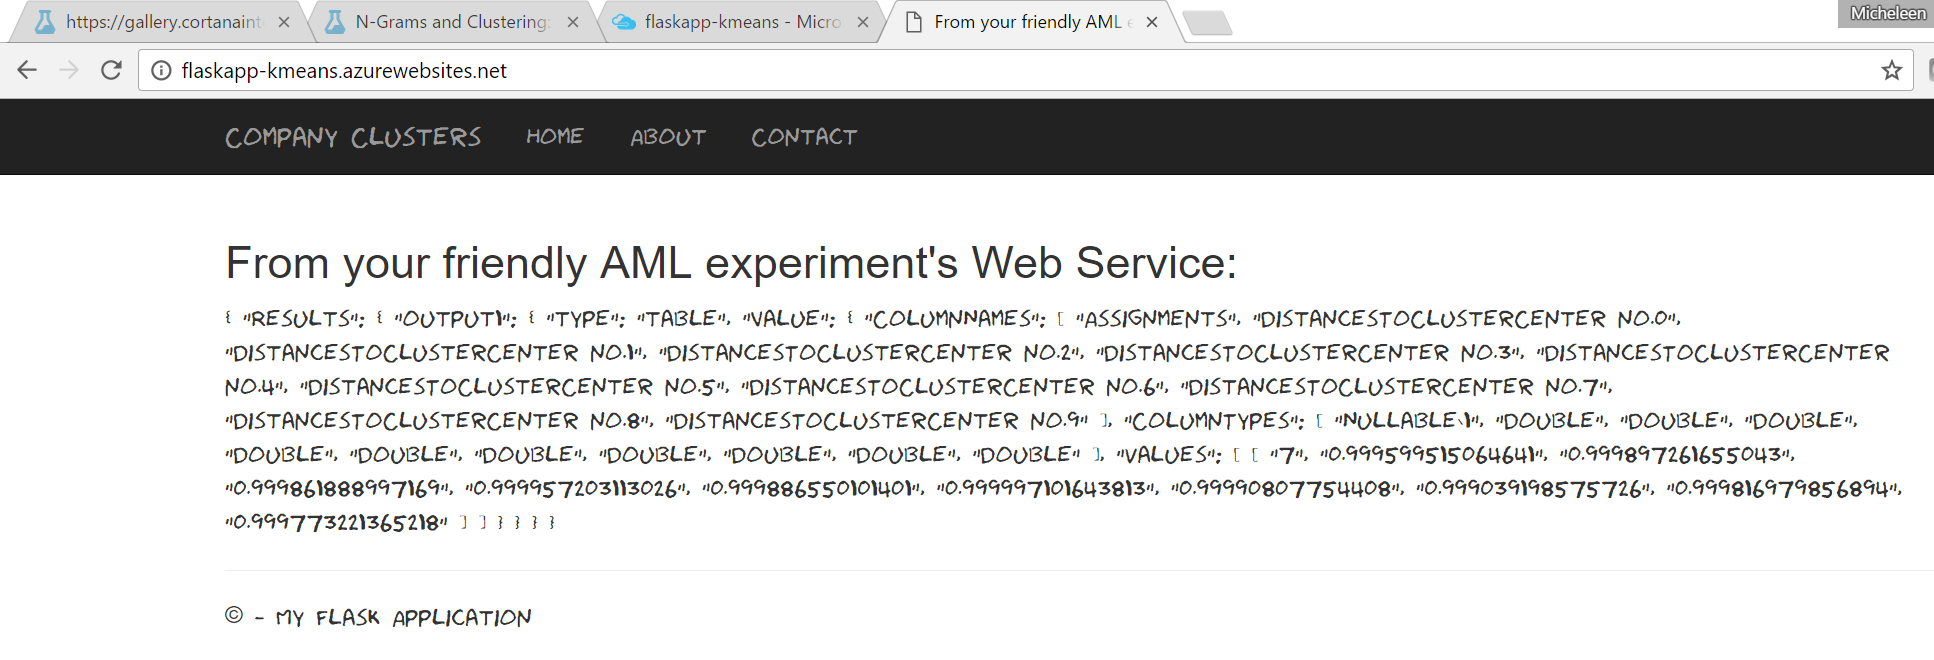
 Above: The deployed web app site
Before you Begin, a Few Things to Do...
Tools
- [recommended]Visual Studio installed (Community 2015 Edition is what I use; NB: the preview of 2017 is adding PTVS soon...I'll update on this later; also, VS 2017 is available for Mac OSX) (Visual Studio Community) with Python Tools for Visual Studio installed (to get the Flask Web App template) which can be added during the install of VS or separately from here
- Git Bash or git installed - included in git download
- https://git-scm.com/downloads
Accounts
- Azure Machine Learning Studio account from https://studio.azureml.net (free)
- GitHub Account - a code repository and collaboration tool we'll use (free)
- https://github.com/join
- Azure account - use the one you have, sign up for a free trial at https://azure.microsoft.com/en-us/free/, or, if you have an MSDN account and Azure as a benefit, link your Microsoft Account or Work/School Account to MSDN and activate the Azure benefit by following this guide
Prerequisites
- The deployed Azure Machine Learning scoring experiment
- Note: We won't cover this experiment and model here as it's not the focus of this particular post, but a link to instructions is just below.
- Aside: These experiments are often called "predictive", but in a clustering model we really just look for scores and cluster assignments, not predictions so let's call it scoring experiment
The scoring experiment which utilizes the k-means model and n-gram featurizer vocabulary created in the training experiment has the following layout in AML Studio:
The scoring experiment you will need can be found here (this will allow you to launch it in AML Studio). Essentially, we are using AML Studio as a clever way to deploy a web service and not much more, but it's capabilities as a canvas for creating a data science workflow are worth checking out if you like a visual workflow-type setup.
Start at this spot in the Azure Docs to get this experiment deployed as a web service to use later in this guide post: https://docs.microsoft.com/en-us/azure/machine-learning/machine-learning-walkthrough-5-publish-web-service#deploy-the-web-service.
A similar guide with good diagrams on deploying the experiment as a web service can be picked up at section "4.2.2. Publishing a trained model as Web Service" in this tutorial: https://github.com/Azure-Readiness/hol-azure-machine-learning/blob/master/004-lab-azureml-experiment.md#422-publishing-a-trained-model-as-web-service.
The Web App Development
Note: Under REQUEST/RESPONSE for the AML Studio experiment (found after deploying as web service from Studio), one will find all of the specs needed to work with this endpoint.
Let's write a web app! We're going to begin in Visual Studio. As an aside, did you know VS 2017 is available for Mac?! What's especially cool is that developers can share projects across Mac and Windows. The Python Tools for Visual Studio extension isn't available, however, on VS 2017 so I'm eagerly awaiting this capability. Will report back later. Since VS 2015 with PTVS is available for us on Windows we will be using the awesome Flask Web Project template that comes with it to kick start our web app dev in Windows 10.
-
Open VS
-
Create a new Python Flask web app project (this template should exist if one chooses Python - scroll down Templates -> Python -> Flask Web Project) with Python 3.5 (or whichever 3 you have will do) into a virtual environment. At this point, you literally have a functioning web app. Hit the Run (your default browser choice is next to the button) in VS and test out this template.
-
Add a new file called
forms.pyto the main directory (alongsideviews.py). This will contain the form-building code through which data will be sent to the REST endpoint for analysis. There are three fields we need in our input form: title, category and text. Title is the company title, category is an optional field for the category of company (e.g. information technology) and text is the Wikipedia article text about that company or some descriptive corpus.
The input form: define in "forms"
Place the following text in the forms.py file:
from wtforms import Form, StringField, TextAreaField, validators

# This class will be used in the webapp as the main input form
class SubmissionForm(Form):
    title = StringField('Title', [validators.Length(min=2, max=30)])
    category = StringField('Category', [validators.Length(min=0, max=30)])
    text = TextAreaField('Text', [validators.Length(min=1, max=1000)])
The routing on the page: define in the "views"
We will be modifying the existing template code as follows.
The imports should look like:
import json
import urllib.request
import os

from datetime import datetime
from flask import render_template, request, redirect
from FlaskAppAML import app

from FlaskAppAML.forms import SubmissionForm
Which added json handling, http request handling, os interaction and the way in which the forms class from above is available for use.
Add a way to grab the API_KEY and URL at the beginning of the views.py file:
# Deployment environment variables defined on Azure (pull in with os.environ)
API_KEY = os.environ.get('API_KEY', "optionally place a default value for local dev here")
URL = os.environ.get('URL', "optionally place a default value for local dev here")
and HEADERS global variable:
# Construct the HTTP request header
HEADERS = {'Content-Type':'application/json', 'Authorization':('Bearer '+ API_KEY)}
def home method definition, to be:
# Our main app page/route
@app.route('/', methods=['GET', 'POST'])
@app.route('/home', methods=['GET', 'POST'])
def home():
    """Renders the home page which is the CNS of the web app currently, nothing pretty."""

    form = SubmissionForm(request.form)

    # Form has been submitted
    if request.method == 'POST' and form.validate():

        # Plug in the data into a dictionary object
        #  - data from the input form
        #  - text data must be converted to lowercase
        data =  {
              "Inputs": {
                "input1": {
                  "ColumnNames": [
                    "Title",
                    "Category",
                    "Text"
                  ],
                  "Values": [ [
                      form.title.data,
                      form.category.data,
                      form.text.data.lower()
                    ]
                  ]
                }
              },
              "GlobalParameters": {}
            }

        # Serialize the input data into json string
        body = str.encode(json.dumps(data))

        # Formulate the request
        req = urllib.request.Request(URL, body, HEADERS)

        # Send this request to the AML service and render the results on page
        try:
            # response = requests.post(URL, headers=HEADERS, data=body)
            response = urllib.request.urlopen(req)
            respdata = response.read()
            result = json.loads(str(respdata, 'utf-8'))
            result = json.dumps(result, indent=4, sort_keys=True)
            return render_template(
                'result.html',
                title="From your friendly AML experiment's Web Service:",
                result=result)

        # An HTTP error
        except Exception as err:
            result = json.loads(str(err.code))
            return render_template(
                'result.html',
                title='There was an error',
                result=result)

    # Just serve up the input form
    return render_template(
        'form.html',
        form=form,
        title='Run App',
        year=datetime.now().year,
        message='Input form to gain insights into a company using Azure Machine Learning')
The html templates: how the information gets served
- We add two new templates: form.html, result.html
The form.html gives us a construct for the user to enter in input data and the result.html, a construct in which the results from the machine learning experiment can be displayed.
Grab the form.html code here.
Grab the result.html code here. Note, this code may result in slightly different web app appearances to this article.
Now that we have some new code to handle calling the AML web service and html templates to handle input and output, let's prepare to deploy by taking a look at some configuration.
Prepare to Deploy the Web App to Azure
Before we publish, we must add two configuration-type files:
- A web configuration file (web.config)
- Virtual environment proxy (ptvs_virtualenv_proxy.py)
The web.config file may need some modifications, however the virtual environment proxy file should work as is from this folder.
Web Configuration file
- Add web.config at project level (alongside requirements.txt file)
It should look something like the following (you can actually add a template web.config similar to this one in VS by right-clicking on the FlaskAppAML folder -> Add -> New Item -> Azure web.config for FastCGI, but it will need a few modifications). Note that the Python version may change in the future and this script might need modification.
<?xml version="1.0"?>
<configuration>
  <appSettings>
    <add key="WSGI_ALT_VIRTUALENV_HANDLER" value="FlaskAppAML.app" />
    <add key="WSGI_ALT_VIRTUALENV_ACTIVATE_THIS"
         value="D:\home\site\wwwroot\env\Scripts\python.exe" />
    <add key="WSGI_HANDLER"
         value="ptvs_virtualenv_proxy.get_venv_handler()" />
    <add key="PYTHONPATH" value="D:\home\site\wwwroot" />
  </appSettings>
  <system.web>
    <compilation debug="true" targetFramework="4.0" />
  </system.web>
  <system.webServer>
    <modules runAllManagedModulesForAllRequests="true" />
    <handlers>
      <remove name="Python27_via_FastCGI" />
      <remove name="Python34_via_FastCGI" />
      <add name="Python FastCGI"
           path="handler.fcgi"
           verb="*"
           modules="FastCgiModule"
           scriptProcessor="D:\Python34\python.exe|D:\Python34\Scripts\wfastcgi.py"
           resourceType="Unspecified"
           requireAccess="Script" />
    </handlers>
    <rewrite>
      <rules>
        <rule name="Static Files" stopProcessing="true">
          <match url="^/static/.*" ignoreCase="true" />
          <action type="Rewrite" url="^/FlaskAppAML/static/.*" appendQueryString="true" />
        </rule>
        <rule name="Configure Python" stopProcessing="true">
          <match url="(.*)" ignoreCase="false" />
          <conditions>
          </conditions>
          <action type="Rewrite" url="handler.fcgi/{R:1}" appendQueryString="true" />
        </rule>
      </rules>
    </rewrite>
  </system.webServer>
</configuration>
Possible modifications or places of note in the web config:
-
The
WSGI_ALT_VIRTUALENV_HANDLERwill very likely need to be modified. Here it isFlaskAppAML.app, referring to my flask application itself. -
The line
<action type="Rewrite" url="^/FlaskAppAML/static/.*" appendQueryString="true" />under rules MUST have the correct project name (here mine was FlaskAppAML). This section ensures the static files (important for the web service appearance) can be found. -
The
scriptProcessor, underhandlersin the web.config xml above, must correspond to the resources existing on the web server's file system (e.g.D:\Python34\python.exe).
Virtual Environment Proxy
The code for this set of helper functions can be found here in the Azure documentation (that similar article talks about deploying continuously from a git repository - a good method to know as well).
Just include ptvs_virtualenv_proxy in the base of your project along with the web.config (and auto-created requirements.txt and runserver.py).
Finally, to test all of this code locally just click the run button in the navi in VS (your default browser should also appear there).
Congrats, you have tested this locally and things seem to be good.
Deploy the Flask Web App
Option 1: Set up a GitHub Repository as the Deployment Option
This is the most customizable way, hence more complex, but also the most transparent and easy to troubleshoot.
- Log in to GitHub and create a new repository (I called mine
flask-webapp-aml, initializing with a README and a .gitignore for Visual Studio files. - In Git bash on the Desktop, type into the terminal the command to clone the new repository, for example: (I'm using SSH because it will allow me to push changes back up):
git clone git@github.com:<your github username without these triangle brackets>/flask-webapp-aml.git- Copy all of the project code to this new repository folder locally (I just
cpon the command line in Git bash) to match this structure:FlaskAppAML/ FlaskAppAML/__init__.py FlaskAppAML/forms.py FlaskAppAML/views.py FlaskAppAML/static -> *our static files* FlaskAppAML/templates -> *the html page templates* env/ -> *the entire python environment* ptvs_virtualenv_proxy.py README.md requirements.txt runserver.py runtime.txt web.config .skipPythonDeployment - If the empty
.skipPythonDeploymentfile is not in the base of your repository, add one now. Also, make sure theenvfolder from the VS project is present. This contains all of the python environment needed for running this web app (really anywhere). We are skipping having the web service custom install all of the necessary modules by giving the service this.skipPythonDeploymentfile and theenvfolder. - Add "__pycache__" on it's own line to my ".gitignore" file and anything you don't want uploaded to the GitHub when we "push" changes.
-
Now it all seems pretty tidy, so it's time to push the changes up to be hosted on GitHub. I add ("stage"), commit (commit my code locally with a message) and push (push up to the web to be hosted on GitHub) all of my additions or any changes I've made. I can do this add/commit/push again as many times as I want in the future. I must, however, do all three consecutively and in that order otherwise it gets complicated. So, my commands look like:
git add .(from the base of the repository)git commit -m "initial commit message"(the -m is our message so be brief, but descriptive - visible to the world)git push(we could also have writtengit push origin master, but it's not necessary to be so verbose right now)
-
Create an App Service Web App in the Azure Portal (https://portal.azure.com) by clicking "+" and search for "web app", then go through the wizard to create one.
- Update the Deployment options in the Azure Portal for the web app. For our Web App, under "APP DEPLOYMENT", open the "Deployment options" blade. For Choose Source, choose GitHub (you may have to log in to your GitHub here to link it). Under Choose project, pick the GitHub repository to which you just pushed code and click OK.
- Now we add a couple of variables to the Azure Portal Web App for safe-keeping. There are "environmental variables" in the code (they look like
os.environ.get('FOO')): one for the AML Web Service's URL and one for the API_KEY - these are the necessary values we need to access our published AML scoring experiment. To have these available for our web app we need to put them somewhere discoverable and that is as variables under "App settings" in the "Application settings" blade for our own Web App in the Azure Portal.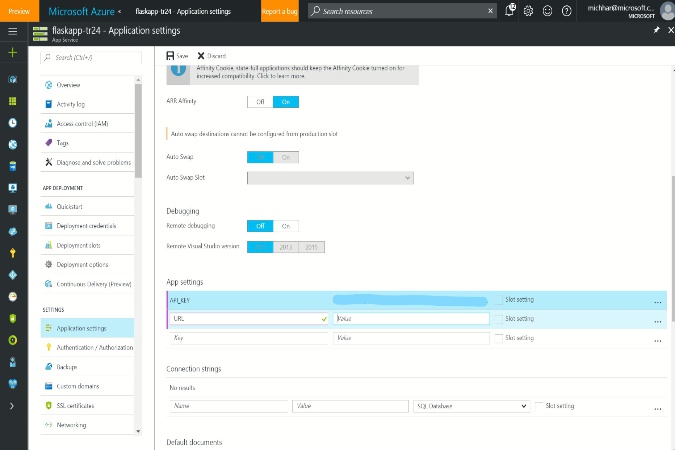
- Ensure that, in the Portal, under Application Settings, Python is set to the appropriate version (default is that "Python" is Off in settings - so will need to manually switch to it's version).
- If we go back to the "Deployment options" we can see how our build is going. This process will automatically happen for us every time a new change is made to our GitHub repository. Ensure that this build completes successfully.
- Finally, if you go to "Overview" and click on the web app's URL, you'll see your site.
Congrats on completing this process! You should now have a functioning barebones, machine learning web app. Go ahead and try it out. :)
If you encounter any problems, check the Troubleshooting section below, Azure docs, or StackOverflow. Also, leave a comment if it's a bug in the code or process.
Option 2: Publish and Deploy from VS as an Azure App Service Web App
To deploy we must also publish this project to Azure (it's done together with VS). Fortunately, from within VS (note, I'm in VS 2017, but it's available in previous releases) there's a "Publish..." option. Right-click on the project name and in the pop-up "Publish..." should be available. Click this and simply go through the wizard to set up an Azure App Service Web App. It should be very straightforward and easy to do.
As an alternative to publishing/deploying directly from VS, one can leverage a git repository or use code on GitHub as a deployment option. Similar instructions can be found in this Azure article.
Make it Your Own
Modify the layout.html file with app name and navi layout changes. Or change your custom stylesheet under static -> content -> site.css.
Go grab all of the code at https://github.com/michhar/flask-webapp-aml and add it to a project, test, develop and deploy. You could even if you wish just fork this repository and deploy directly from that in the Azure Portal, but then that would have been too easy. ;)
Troubleshooting
- All sample code can be found at https://github.com/michhar/flask-webapp-aml - it may, over time, have more complex samples, so check it out.
- Go to Application Settings and ensure Python is enabled along with other key settings in the Azure Portal
- Go to Console (under Development Tools) and make sure all files and programs specified in the
web.configexists. - Ensure in
web.config, that the "scriptProcessor" key/value in handlers is correct (that these paths exist on the server file system). - Check FREB Logs in the Portal for more information around warnings and errors (make sure you are logging for those during this phase).
- Post comments here or if around the code, under issues here: https://github.com/michhar/flask-webapp-aml/issues - many thanks!