Posted: 2016-11-07
Command Line Emulator for the Bot Framework - interacting with ocrbot on Shakespeare
UPDATE: The Command Line Emulator has been replaced with a full-fledged emulator which is cross-platform (info and install here).
tl;dr: I built a simple OCR bot using the Bot Framework (BF) from Microsoft and the Cognitive Services Computer Vision API. I chose the Node.js Bot Builder SDK from BF. I tested with the BF's unix-compatible emulator (black box above). It was nice and straightforward the whole way through. All of the instructions are here, but feel free to keep reading.
There's really almost too much to say about chat bots: definitions, bot builders, history (more), warnings and cautionary tales (more), guidelines, delightful stories, sad stories, etc. For our purposes, other than a few considerations, I'll sum it up with: they've been around for decades and will be for many more.
However, let's cover some vocabulary to start.
A blog post here details the different types of chat bots, progressing from simple to ones that can hold down a conversation. These are the bot types discussed and an example to illustrate:
- Notifier - sends a one-way message e.g. ping me with today's weather forecast at the start of the day ("push" bot i.e. bot initiates)
- Reactor - replies when I send a message, but does not remember anything e.g. send me the weather forecast when I ask for it ("pull bot" i.e. I initiate), but don't remember me or what I ask for
- Responder - replies and remembers me and my message history e.g. send me today's weather forecast, use my user name on this channel, and remember what cities I choose
- Conversationalist - replies, remembers me and my message history, knows what service I'm on, if there are others there, and when I come and go e.g. send me today's weather forecast, use my user name on this channel, remember what cities I choose, format it nicely for this channel, and if the conversation is old, archive it and send as email
Bot builders lower the activation barrier for developing bots and the MS Bot Framework (BF) Bot Builder SDKs give us a wealth of methods for building dialog and user prompts, making the creation of effective waterfalls really easy. Along with the SDKs, the BF provides free emulator tools, a Windows-compatible desktop app and a Mac OS X / Linux-compatible console app (more information on emulators here).
I know you've been waiting to dive into the code, so let's begin...
There are two choices on bot builder functions for testing locally. We can use the ConsoleConnector which simply and directly allows us to run our Node.js code on the command line. Using the bot builder SDK our code is pretty concise (see more examples on the Core Concepts page for the BF here):
var builder = require('botbuilder');

// Create a bot and connect it to the console
var connector = new builder.ConsoleConnector().listen();
var bot = new builder.UniversalBot(connector);
Interacting with ocrbot could look like:
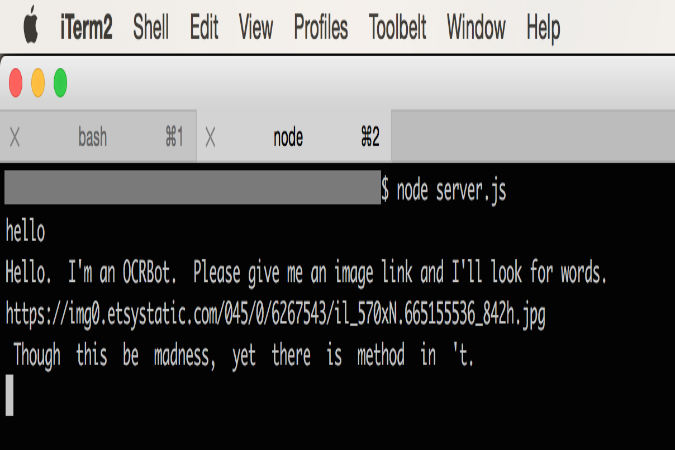
It's simple, but we don't get to see the actual JSON that gets passed to the bot and the JSON passed back. If we want to be able to see the message and also write code that can be used for production later, the Bot Framework Emulator is the way to go. Note, this is the beginning of my server.js Node.js file - see my ocrbot github repo for the complete project and code and the included lab file for more instructions on doing this at home. We replace ConsoleConnector with ChatConnector, for a full deployment-compatible setup, as follows:
var restify = require('restify');
var builder = require('botbuilder');

// Create bot
var connector = new builder.ChatConnector(botConnectorOptions);
var bot = new builder.UniversalBot(connector);

// Setup Restify Server
var server = restify.createServer();

// Handle Bot Framework messages
server.post('/api/messages', connector.listen());

// Serve a static web page - for testing deployment
server.get(/.*/, restify.serveStatic({
    'directory': '.',
    'default': 'index.html'
}));

server.listen(process.env.port || process.env.PORT || 3978, function () {
    console.log('%s listening to %s', server.name, server.url);
});
One of the major reasons I used github to host this project is that (and outlined in a later blog, TBD) it afforded me the ability to do a continuous deployment directly from the repo. Any change I push up, immediately reflects in my bot on whichever channel I'm on - it was actually pretty astonishing to see a quick typo fix show up so immediately when chatting to my bot at the same time as pushing up the change. But I'll save this for the deployment article to come.
I've always been a fan of command terminals, so even on a Windows machine I'd probably choose to download and use the BF Command Terminal Emulator (download instructions are here). Honestly, I enjoy the simplicity and control a command prompt affords. And now I can develop bots in the exact same way agnostic of OS.
So, I decided to create a bot I could give image links to and if there was text in the picture it would reply with that text. Pretty simple and straightforward since I knew about the free subscriptions to Microsoft Cognitive Services and in particular the Vision APIs. I went to the Cognitive Services main page and clicked on My Account and signed up (or I could have signed up this way with MS, github, or LinkedIn accounts). After that I had a secret key for the service. Now to splice that into my bot.
So, I borrowed much of my code from Samuele Resca's blog post (excellent blog, btw). I placed these helper methods in with the server.js code above:
//=========================================================
// URL Helpers
//=========================================================


var extractUrl = function _extractUrl(message) {

    if (message.type !== "message") return;

    if (typeof message.attachments !== "undefined"
        && message.attachments.length > 0) {
        return message.attachments[0].contentUrl;
    }

    if (typeof message.text !== "") {
        return _findUrl(message.text);
    }

    return "";
};


function _findUrl(text) {
    var source = (text || '').toString();
    var matchArray;

    // Regular expression to find FTP, HTTP(S) and email URLs.
    var regexToken = /(((http|https?):\/\/)[\-\w@:%_\+.~#?,&\/\/=]+)/g;

    // Iterate through any URLs in the text.
    if ((matchArray = regexToken.exec(source)) !== null) {
        var token = matchArray[0];
        return token;
    }

    return "";
}
Then I set up a config file as shown in the repository containing my Computer Vision API key (as well as placeholders for the future app id and app password I get after the deployment step - in a followup article TBD). So, don't worry about the app id and app password for now.
If you are doing this at home, replace the process.env.VISION_API_KEY with a string holding your key (this is a separate file I called configuration.js), see instructions in this lab file.
var _config = {
    // Ignore this part for now...
    CHAT_CONNECTOR: {
        APP_ID: process.env.MICROSOFT_APP_ID, //You can obtain an APP ID and PASSWORD here: https://dev.botframework.com/bots/new
        APP_PASSWORD: process.env.MICROSOFT_APP_PASSWORD
    },

    //  Replace the API_KEY below with yours from the free trial
    COMPUTER_VISION_SERVICE: {
        API_URL: "https://api.projectoxford.ai/vision/v1.0/",
        API_KEY: process.env.VISION_API_KEY  //You can obtain an COGNITIVE SERVICE API KEY: https://www.microsoft.com/cognitive-services/en-us/pricing
    }
};
exports.CONFIGURATIONS = _config;
Then back in my server.js file with the main code I set up my vision OCR functions to read the image text (basically call out the the Computer Vision service with an image url) and then process the text:
//=========================================================
// Vision Service
//=========================================================

var request = require("request");

var readImageText = function _readImageText(url, callback) {

    var options = {
        method: 'POST',
        url: config.CONFIGURATIONS.COMPUTER_VISION_SERVICE.API_URL + "ocr/",
        headers: {
            'ocp-apim-subscription-key': config.CONFIGURATIONS.COMPUTER_VISION_SERVICE.API_KEY,
            'content-type': 'application/json'
        },
        body: {url: url, language: "en"},
        json: true
    };

    request(options, callback);

};

var extractText = function _extractText(bodyMessage) {

    if (typeof bodyMessage.regions === "undefined") return "";

    var regs = bodyMessage.regions;

    if (typeof regs[0] !== "undefined" &&
        regs[0].lines.length > 0) {

        text = "";

        var lines = regs[0].lines;

        // For all lines in image ocr result
        //   grab the text in the words array
        for (i = 0; i < lines.length; i++) {
            var words = lines[i].words;
            for (j = 0; j < words.length; j++) {
                text += " " + words[j].text + " ";
            }
        }

        return text;
    }

    return "Sorry, I can't find text in it :( !";
};
Finally, we tie it all together in a user dialog:
//=========================================================
// Bots Dialogs
//=========================================================

bot.dialog('/', function (session) {

    // Use our url helper method
    var extractedUrl = extractUrl(session.message);

    // Nothing returned?  Ask for an image url again...
    if (extractedUrl === "") {
        session.send("Hello.  I'm an OCRBot.  Please give me an image link and I'll look for words.");
    }

    // Get a valid url?  Send it off to the Vision API for OCR...
    readImageText(extractedUrl, function (error, response, body) {
        session.send(extractText(body));
    })
});
We could have added a waterfall here to say confirm they want to process this image or perhaps added a built-in prompt that allows uploading an image attachment. Perhaps in future releases.
Now we test.
On Windows one would double click on the BFEmulator.exe directly and on Mac we use the Mono framework software to run BFEmulator.exe from the command line. Pretty easy, peasy.
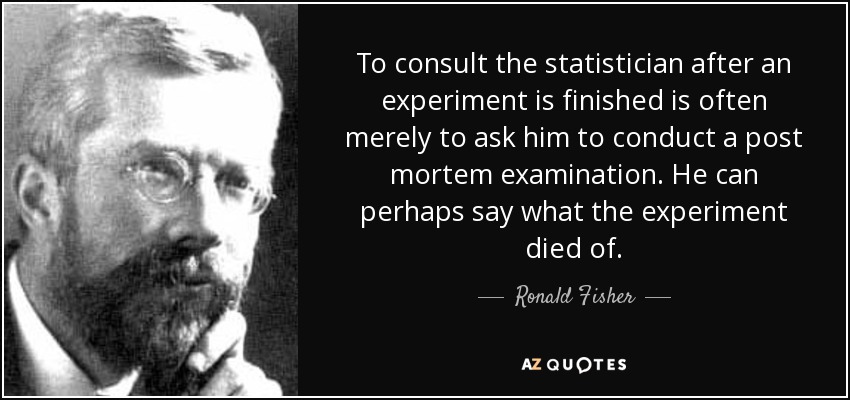
Let's take this image:
The emulator experience will look a little something like:
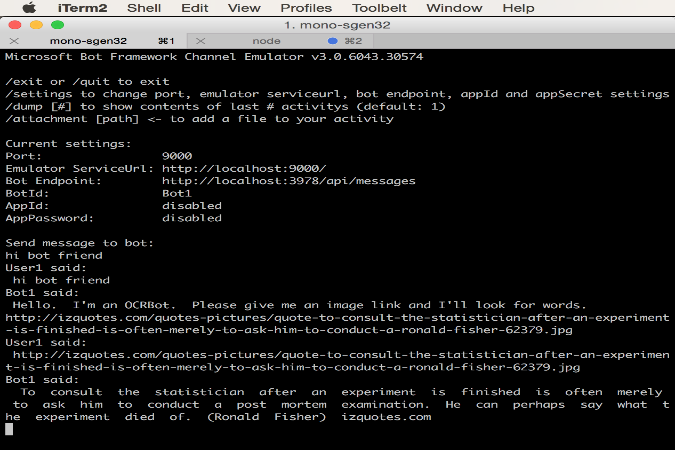
Command Line Emulator for the Bot Framework - interacting with ocrbot locally on stats
In conclusion, to get started now, check out the github repo and start playing with the code and emulator. For more instructions check out this lab. Chat later!